FlowEngine n8n Community Nodes
Official n8n integration for FlowEngine AI-powered workflows
Installation
Install the FlowEngine community node directly from n8n's Community Nodes settings:
npm i n8n-nodes-flowengineFlowEngine Node
Generate complete n8n workflows from text descriptions. Describe what you want to automate, and get a ready-to-import workflow. Choose between Regular (faster, cheaper) or Boost (more powerful) models. Uses your FlowEngine token balance.
What It Does
- ✓Describe your automation in plain English
- ✓AI generates a complete n8n workflow JSON
- ✓Import the workflow directly into n8n
- ✓Regular model (fast, cheap) or Boost model (powerful, expensive)
- ✓Uses FlowEngine API key from Settings
- ✓Token usage deducted from your FlowEngine balance
Setup Guide
1. Open n8n Settings → Community Nodes
Navigate to your n8n instance settings and find the Community Nodes section.
2. Install the FlowEngine Package
Enter n8n-nodes-flowengine in the package name field and install.
3. Search for FlowEngine Node
After installing, search for "FlowEngine" in the n8n node search panel.

4. Add FlowEngine API Credentials
Get your API key from FlowEngine Settings → API Access and add it to your FlowEngine credentials.

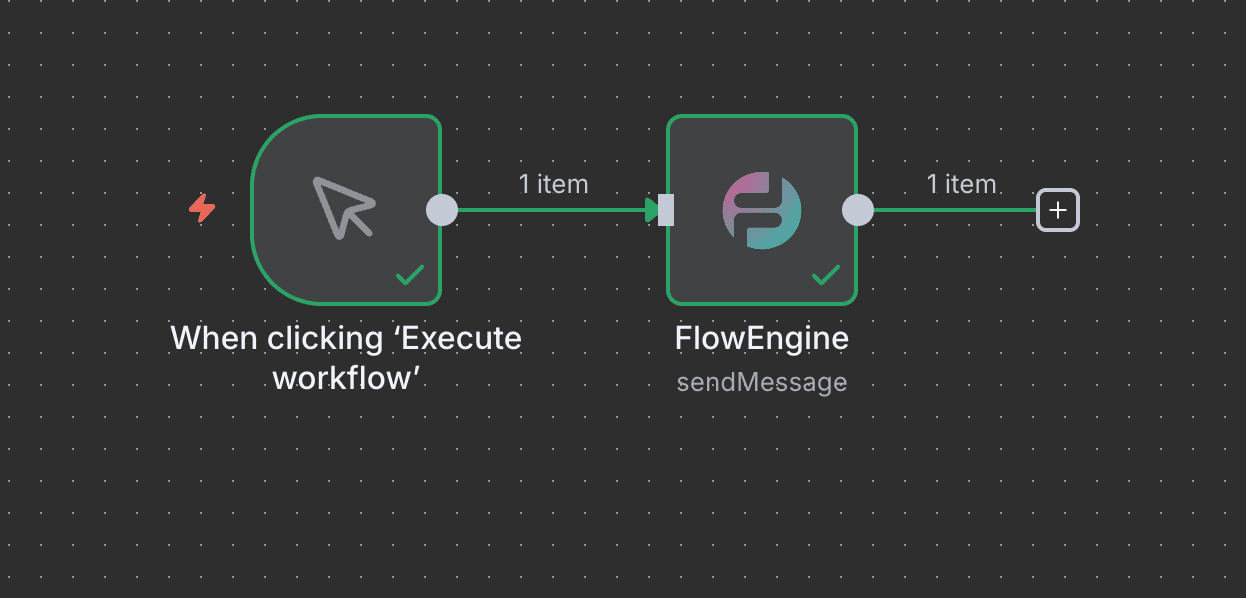
5. Add Node to Your Workflow
Add the FlowEngine node to your workflow.
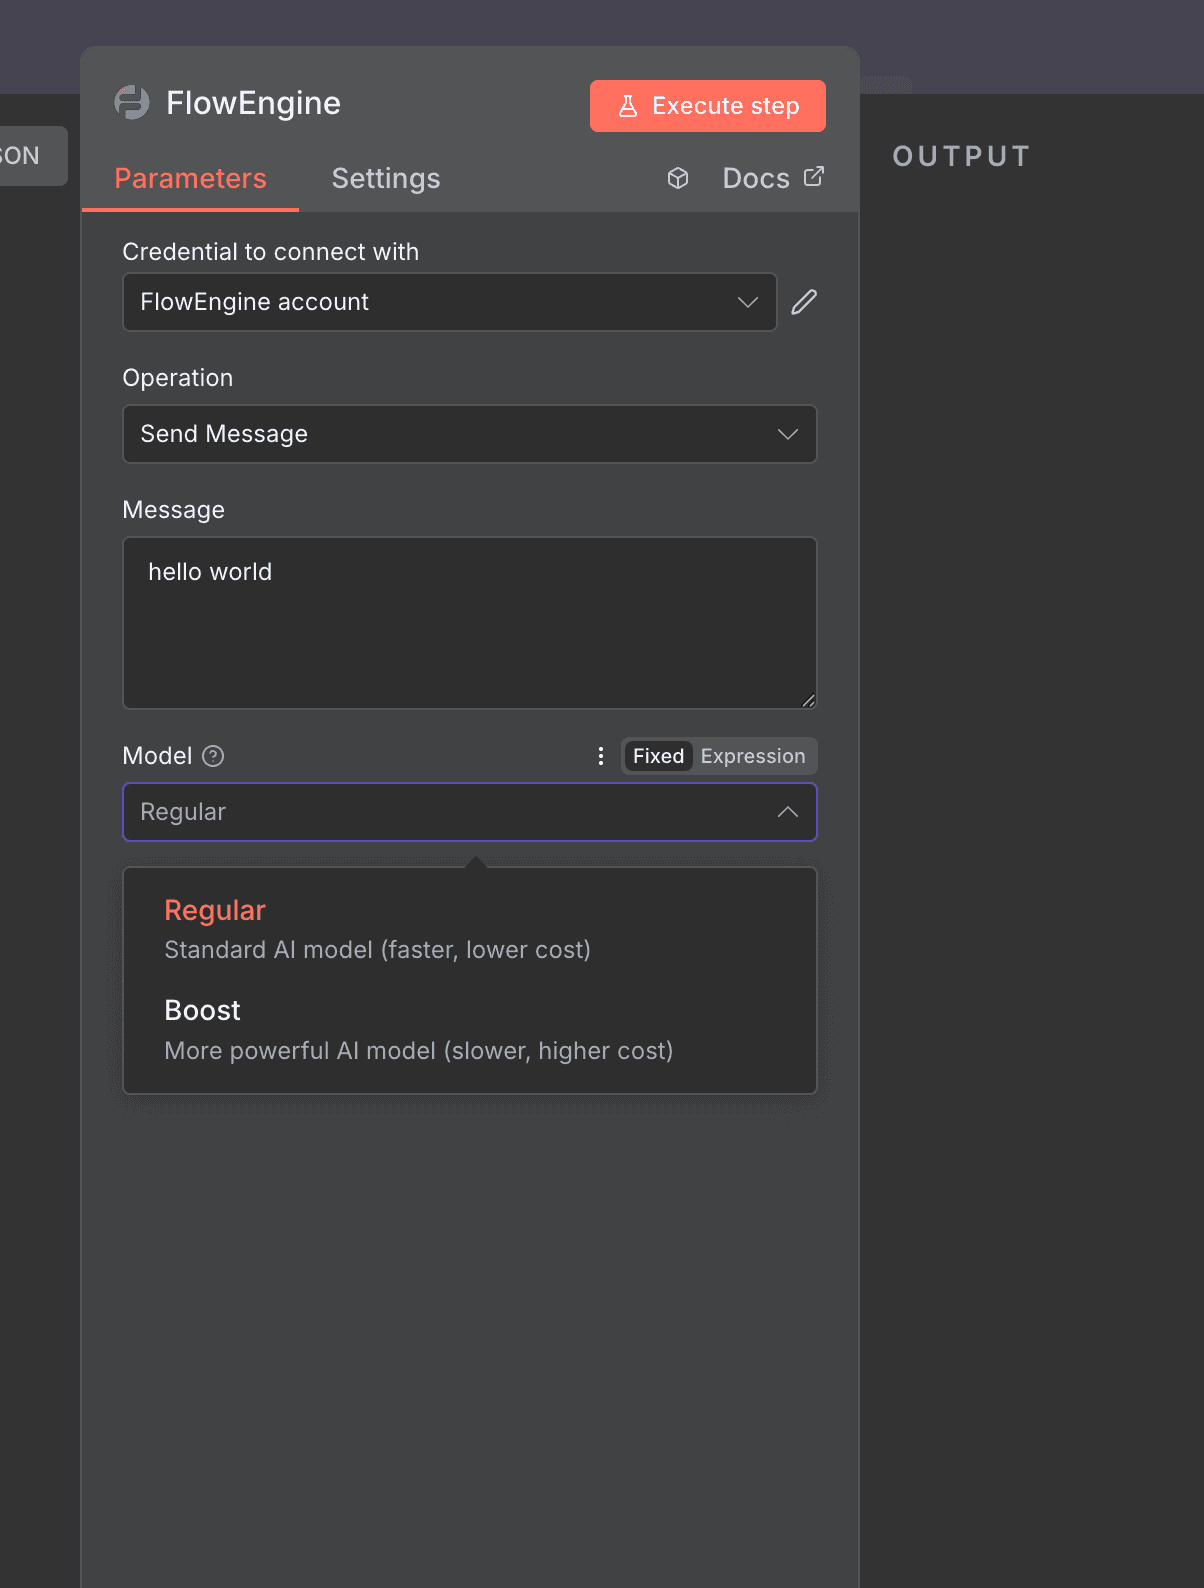
6. Configure Message and Model
Enter your prompt and select a model (Regular or Boost).
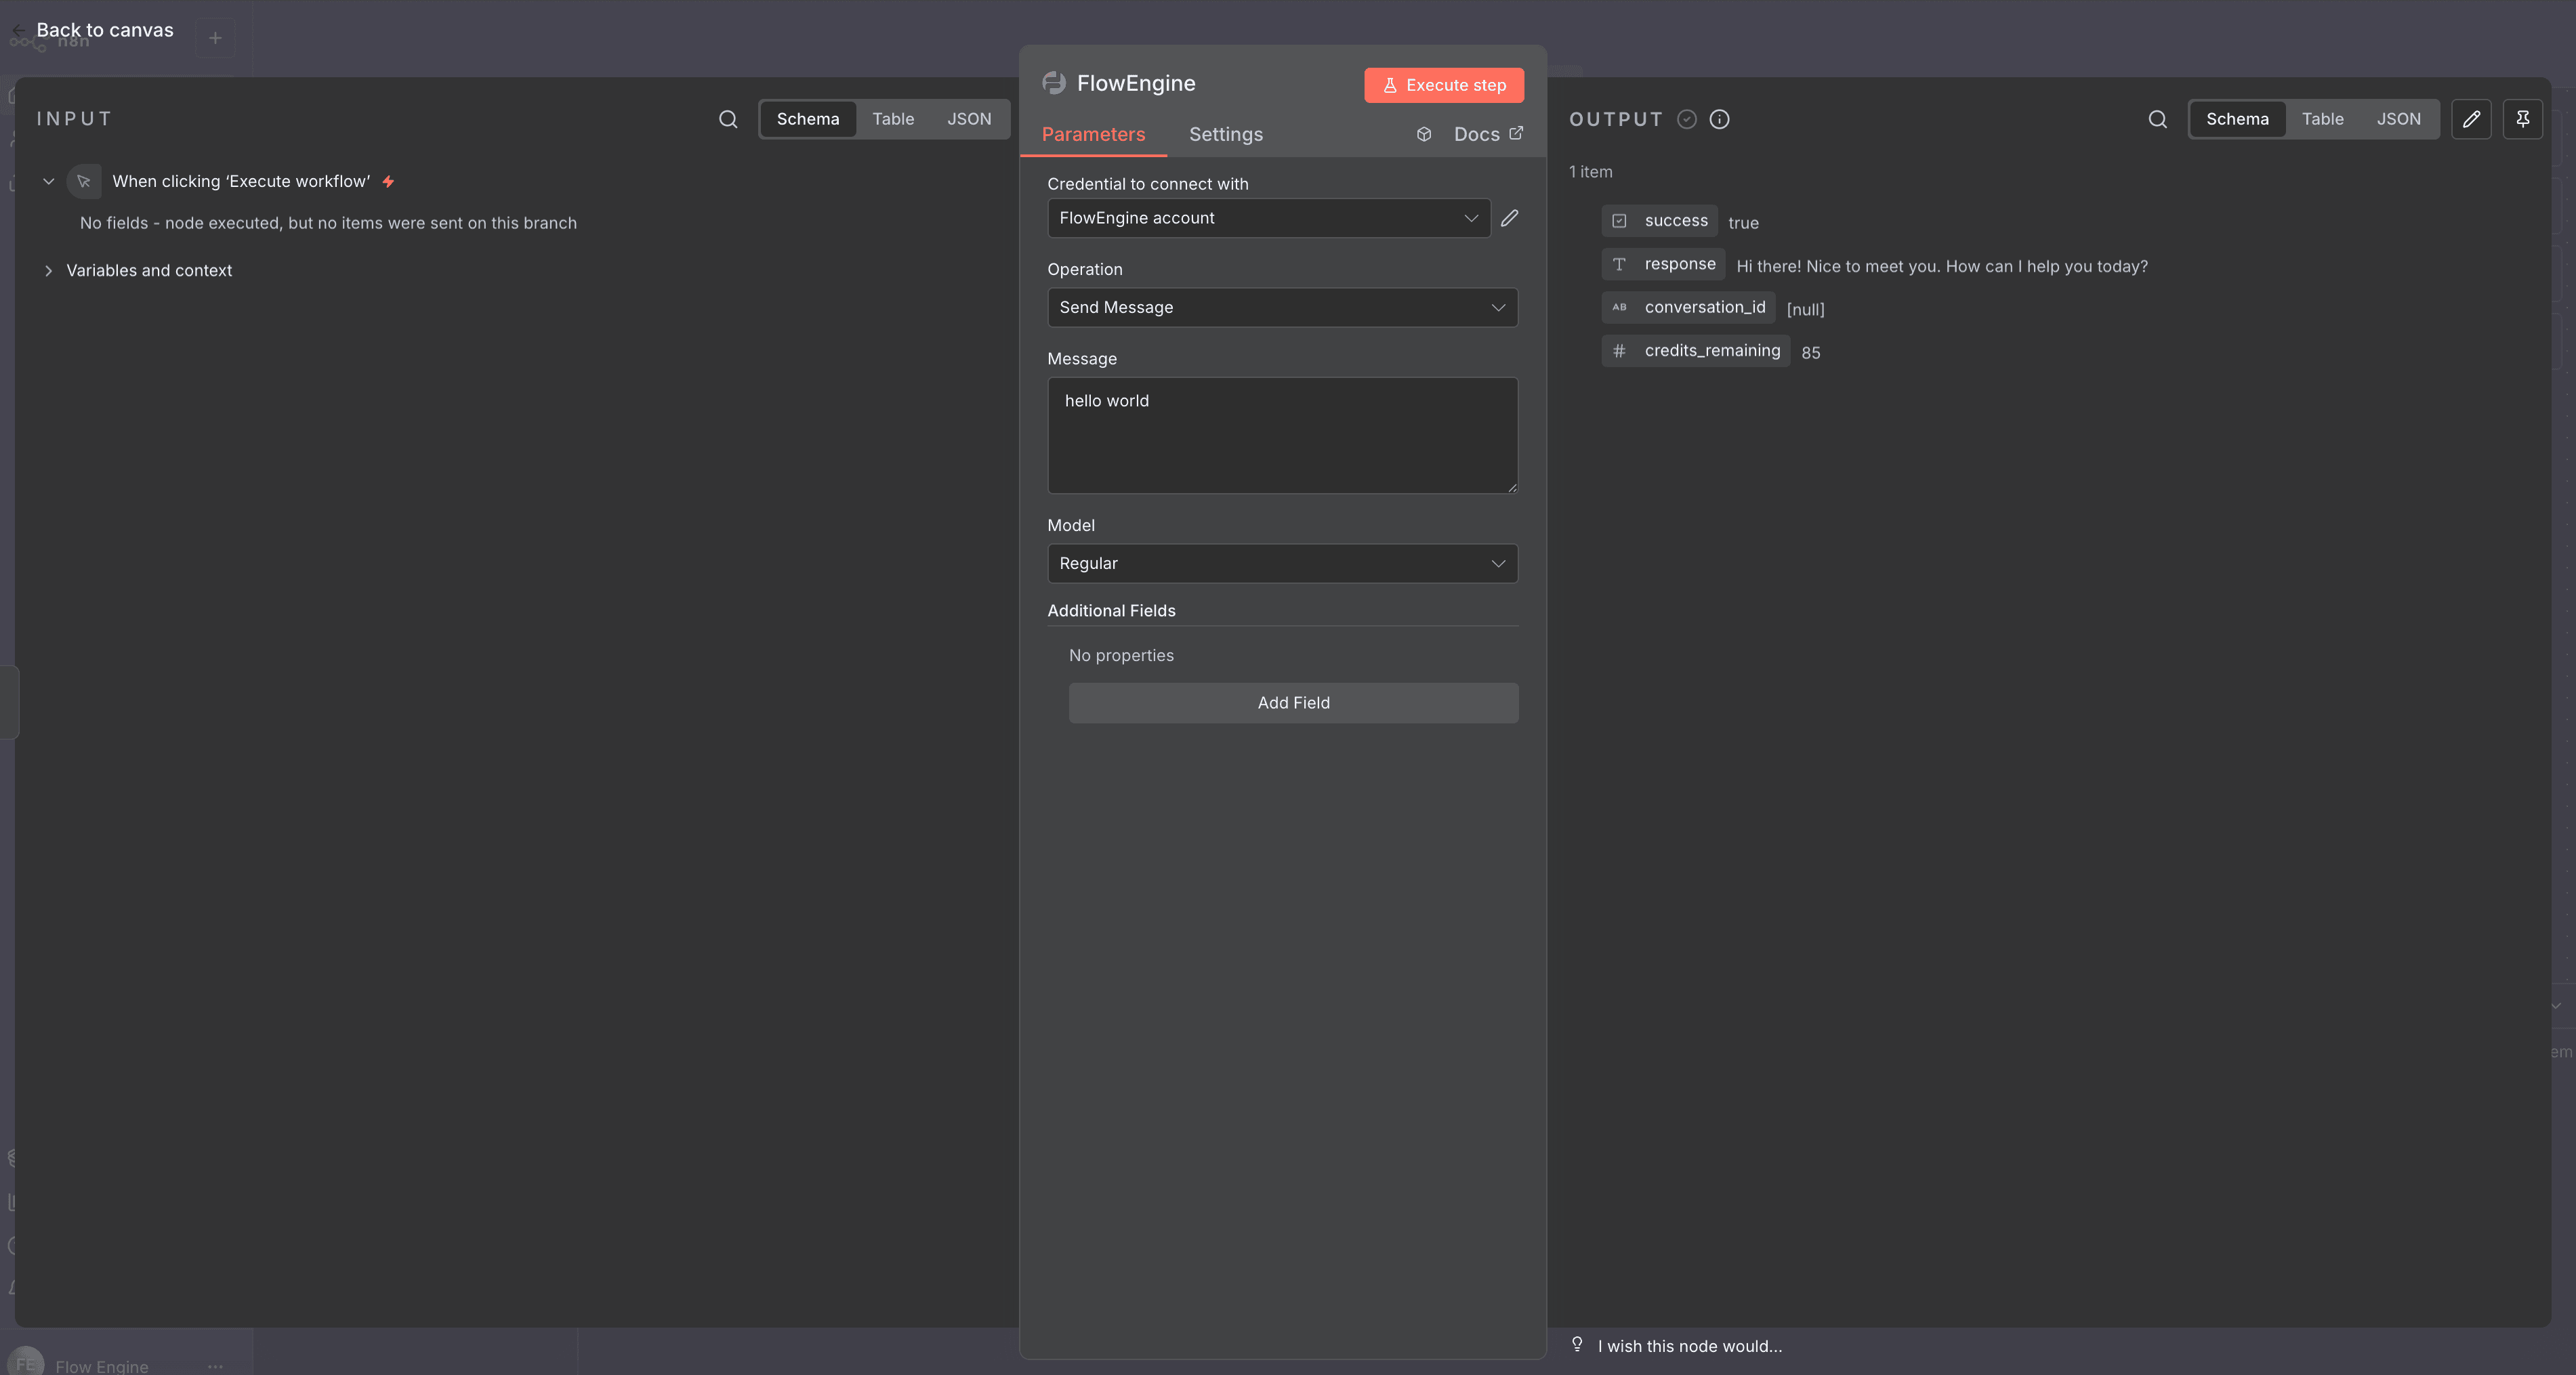
7. Execute and View Results
Run your workflow and see the AI response in the output panel!
Example Use Cases
📝 Content Generation
Generate blog posts, social media content, or product descriptions using AI
📧 Customer Support
Create personalized email responses and handle customer inquiries automatically
🔍 Data Analysis
Analyze, summarize, and extract insights from text data
💬 Conversational AI
Build intelligent chatbots with conversation memory and context
Node Parameters
Message
The message to send to FlowEngine AI (supports dynamic expressions)
Model
Regular: Standard AI model (faster, lower cost)
Boost: More powerful AI model (slower, higher cost)
Conversation ID (Optional)
Maintain conversation context by providing the same ID across multiple requests
Response Output
{
  "success": true,
  "response": "AI-generated response text",
  "conversation_id": null,
  "credits_remaining": 85
}Email Test Node
The Email Test node provides a simple way to test email functionality in your workflows. Perfect for debugging email automations, validating SMTP configurations, and ensuring your email integrations are working correctly before going live.
Key Features
- ✓Quick email configuration testing
- ✓SMTP validation
- ✓Debug email delivery issues
- ✓Preview email formatting

How to Use
- 1. Add the Email Test node to your workflow
- 2. Enter the recipient email address
- 3. Optionally customize the subject and message
- 4. Execute the node to send a test email
- 5. Check the output to verify delivery status
Use Cases
🔧 SMTP Testing
Validate your SMTP configuration before deploying production email workflows
🐛 Debugging
Troubleshoot email delivery issues in your automation workflows
✅ Pre-deployment Checks
Verify email functionality before going live with customer-facing workflows
🎨 Template Preview
Test email templates and formatting before sending to recipients
FlowEngine LLM
Access 100+ AI models from OpenAI, Anthropic, Google, Meta, Mistral, and more directly in n8n.
Key Features
- ✓Access to 100+ AI models from multiple providers
- ✓Pre-configured for paid FlowEngine hosting
- ✓Works with your FlowEngine token balance
- ✓Easy integration with LangChain and AI Agent workflows
How It Works:
- ✅ Paid FlowEngine hosting: API key pre-configured, works instantly
- ⚙️ Free tier or hosting outside FlowEngine: Add your API key from Settings → API Access
- 💳 Token usage: Uses your FlowEngine token balance (top up in Settings)
How to Use
- 1. Add the FlowEngine node to your workflow
- 2. Select the "FlowEngine LLM" operation
- 3. Choose your AI model from the dropdown
- 4. Enter your message and execute
🎯 100+ Models
Access multiple AI providers in one place
🚀 Pre-configured
API key ready for paid FlowEngine hosting
💳 Token-based
Uses your FlowEngine token balance
Free tier or hosting outside FlowEngine? Get your API key from Settings → API Access and add it to the node. Top up tokens in Settings.
FlowEngine Session ID
The missing link for AI Agent setup. Generate and manage session IDs effortlessly for AI agents with memory. Perfect for maintaining conversation context across multiple interactions.
Key Features
- ✓Generate fresh session IDs for new conversations
- ✓Maintain persistent sessions across loop iterations
- ✓Uses native Node.js crypto for secure ID generation
- ✓Two modes: Generate or Persist
- ✓No API key required - works instantly
How to Use
- 1. Add the FlowEngine Session ID node to your workflow
- 2. Choose a mode: Generate (new ID each time) or Persist (same ID across iterations)
- 3. Connect to your AI Agent node
- 4. Use the session ID output in your AI Agent's session ID field
Use Cases
💬 Conversational AI
Maintain conversation memory across multiple user messages
🔄 Loop Workflows
Keep the same session ID consistent within loop iterations
🤖 Multi-Agent Systems
Generate unique sessions for each agent in your workflow
📊 Session Tracking
Track and log conversations with unique identifiers
Response Output
{
  "sessionId": "a1b2c3d4-e5f6-7890-abcd-ef1234567890"
}FlowEngine Data Standardize & Clean
Clean and transform data without code. Perform fuzzy deduplication, format phone numbers, normalize emails, standardize text capitalization, and convert object keys - all with simple configuration.
Key Features
- ✓Fuzzy deduplication - removes similar records automatically
- ✓Phone number formatting - converts to E.164 international standard
- ✓Email normalization and validation
- ✓Smart text capitalization (Title Case, UPPER, lower)
- ✓Object key standardization (snake_case / camelCase conversion)
- ✓No API key required - works instantly
How to Use
- 1. Add the Data Standardize & Clean node to your workflow
- 2. Select the operation: Deduplicate, Format Phone, Normalize Email, Capitalize, or Convert Keys
- 3. Configure the operation-specific options
- 4. Connect your data source and execute
Available Operations
🔍 Fuzzy Deduplication
Automatically identify and remove similar records based on configurable similarity threshold. Perfect for cleaning up contact lists, product catalogs, and more.
📱 Phone Number Formatting
Convert phone numbers to E.164 international standard format. Handles various input formats and validates numbers automatically.
📧 Email Normalization
Normalize email addresses (lowercase, trim whitespace) and validate format. Catch invalid emails before they cause issues downstream.
🔤 Text Capitalization
Smart capitalization: Title Case for names, UPPERCASE for codes, lowercase for emails. Handles edge cases like "McDonald" and "O'Brien".
🔧 Key Conversion
Convert object keys between snake_case and camelCase. Essential for API integrations with different naming conventions.
Use Cases
📋 CRM Data Cleanup
Clean and standardize contact data from multiple sources
🔗 API Integration
Transform data between APIs with different naming conventions
📊 Data Pipeline
Ensure data quality before importing to databases or analytics
📨 Marketing Lists
Deduplicate and validate email lists before campaigns
Support & Resources
- 📦 npm Package: n8n-nodes-flowengine
- 📖 API Documentation: FlowEngine API Docs
- 💬 Community: Join our Discord
- ✉️ Email Support: [email protected]
Ready to Get Started?
Get your free API key and start building AI-powered workflows today!
Get API Key